In this post I mentioned I’ll be adding twitter notification to my moodlight IKEA hack.
I decided not to. Ethernet Shield is too precious to me to use it just for a moodlight; I’d want it to experiment on other stuff too :3
Here’s a video of the light blinking and turning off based on mentions:
So, I’ll be demoing here a video of an Arduino project that blinks an RGB SMD light on new mentions.
Let me explain first on how this works:
- Arduino connects to a web server (In this example, its my laptop running WAMP) to request latest twitter updates.
- The webserver queries twitter using some PHP code to retrieve the latest 20 mentions.
- The webserver checks with it’s database if the retrieved tweets already exist (Which means they’ve already been seen) or not.
- The webserver returns the number of new tweets only.
- Arduino gets the number of new tweets and blink blue\green accordingly.
I had to use a webserver because Arduino doesn’t support HTTPS. It’d be fine to just query based on a specific user’s tweets and do some coding kung fu there. But sometimes a user is set to private. So to make it proper-ish, I preferred using a webserver to do the dirty HTTPS work.
Here’s a picture of the SMD light:
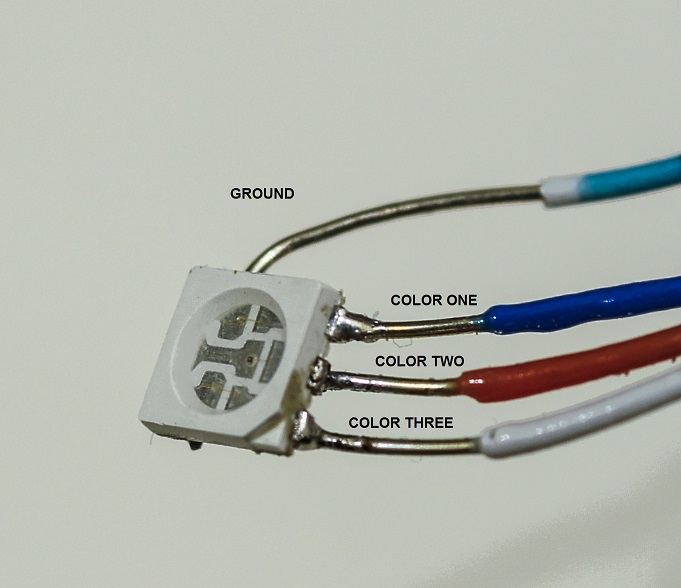
The reason why I used referred to colors by numbers not actual colors (Red, Green, Blue) is that, well, I don’t know which one is which. I just know which is ground and which is a color. I just didn’t care much about which color to use. I wasn’t THAT picky.
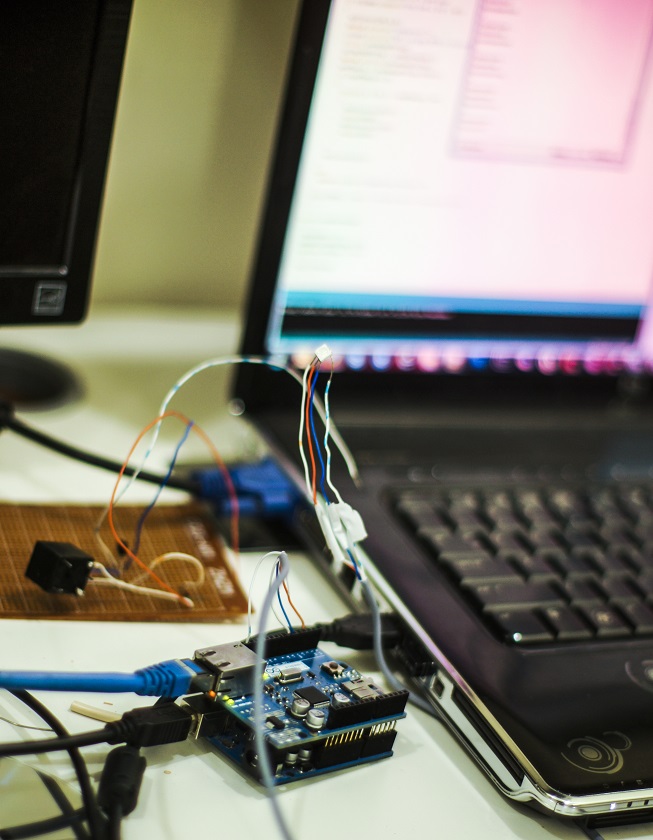
Anyway, here’s what you do to Arduino:
- Attach an Ethernet Shield to Arduino
- Connect the ground pin to whichever ground pin you find in your Arduino\Ethernet shield
- Connect the remaining wires to PIN #3, #5, and #6.
- Plug in the USB and Ethernet cables
I’ll be explaining what you need to do coding-wise:
First, you need to include SPI.h and Ethernet.h because, well, you’ll be using your Ethernet Shield.
And because you’ll be using the Arduino as a client, you’re most likely behind a DHCP network which means you don’t really have to set up IP Adresses. so just set the mac address by assigning one. Then declare a client as an EthernetClient.
Then, you’ll need to set up which pin is used for what. I choose 3,5,6 because they’re PWM. As in, they’re analog output, not just digital. Which means we can change the power output from 0 to 255. Not just a simple HIGH and LOW. Then easily begin and go through the loop.
In the loop, you’ll need to connect and send out the HTTP headers manually by doing “GET FILEPATH HTTP/1.0\r\n\r\n”. Why \r\n\r\n? Because that’s how the webserver knows you’re done sending your header.
After sending, you’ll have to do a while loop as long as the client is online. Inside that loop, have an IF-STATEMENT to see if client.available() is true or not to read out the data. Client.available() means that there’s data ready to be read. Then parse it according to what you like.
I recommend giving a delay at the end of the loop() by minutes… Perhaps 5 minutes. Why? So you don’t exhaust your requests and get “REQUESTS EXCEEDED LIMIT” kind of error.
Here’s the Arduino code(Inspired by this):
#include <SPI.h>
#include <Ethernet.h>

byte mac[] = {
  0xDE, 0xAD, 0xBE, 0xEF, 0xFE, 0xED };

EthernetClient client;

String readString;
int pinThree = 0;
int pinFive = 0;
int pinSix = 0;
char inString[32];
int stringPos = 0;
boolean startRead = false;
int newTweets = 0;

void setup()
{

  pinMode(3, OUTPUT);
  pinMode(5, OUTPUT);
  pinMode(6, OUTPUT);

  Ethernet.begin(mac);

  Serial.begin(9600);
  SetColor(0,0,0);
}

void loop()
{
  delay(5000);
  Serial.println("Connecting...");
  SetColor(0,0,0);

  if (client.connect("192.168.1.102", 80))
  {
    SetColor(100,0,0);
    Serial.println("Connected!");
    client.println("GET /at.php HTTP/1.0\r\n\r\n");
    String incomingString;
    incomingString = readIncoming();
    Serial.println(incomingString);
    newTweets = incomingString.toInt();
    if (newTweets > 0)
    {
      for(int i = 0; i < newTweets; i++)
      {
        SetColor(0,100,0);
        delay(1000);
        SetColor(0,0,100);
        delay(1000);
      }
    }
    SetColor(0,0,0);
  }
  else
    Serial.println("Connection failure!");

  delay(3000);
}

String readIncoming()
{
  stringPos = 0;
  memset(&inString,0,32);
  boolean doLoop = true;

  while(doLoop)
  {
    if (client.available())
    {
      char c = client.read();
      if (c == '#')
        startRead = true;
      if (startRead)
      {
        if (c != '\n')
        {
          if (c != '#')
          {
            inString[stringPos] = c;
            stringPos++;
          }
        }
        else
        {
          startRead = false;
          client.stop();
          client.flush();
          Serial.println("Disconnected.");
          doLoop = false;
        }
      }
    }
  }
  return inString;
}

void SetColor(int Three,int Five, int Six)
{
  analogWrite(3, Three);
  analogWrite(5, Five);
  analogWrite(6, Six);
  pinThree = Three;
  pinFive = Five;
  pinSix = Six;
}
Now comes the PHP part:
What I did wasn’t professional neither proper by any mean. I was just in a rush to get this over with so I can start with other projects.
Here’s what you need to do:
- Download this and extract it somewhere in your website.
- Create a twitter app HERE
- Create a database and a table in your website with at least a field called “id_str”. We’ll be using this to store and search tweets by their unique IDs.
- Create a “config.php” file in the extracted folder and write down the following:
<?php

define('CONSUMER_KEY', YOUR_CONSUMER_KEY_HERE);
define('CONSUMER_SECRET', YOUR_CONSUMER_SECRET_HERE);
define('OAUTH_CALLBACK', YOUR_CALLBACK_URL); //You don't really need this
define('OAUTH_TOKEN', YOUR_OAUTH_TOKEN);
define('OAUTH_TOKEN_SECRET', YOUR_OAUTH_SECRET);

$server = "localhost";
$username = database_username;
$password = database_password;
$db = database_name;
?>
Of course, replace the red text with whatever fill their place.
Now create a new PHP file and fill down the following (I named mine “at.php”):
<?php
    require_once('twitteroauth/twitteroauth.php');
    require_once('config.php');

    $connect = new mysqli('localhost', $username, $password, $db);
    if ($connect->connect_errno > 0)
        die("Error: Cannot connect to database.<br>");

    mysqli_query($connect, "SET CHARACTER SET utf8");

    $access_token = OAUTH_TOKEN;

    $connection = new TwitterOAuth(CONSUMER_KEY, CONSUMER_SECRET, OAUTH_TOKEN, OAUTH_TOKEN_SECRET);

    $content = $connection->get('statuses/mentions_timeline');

    $i = 0;
    $unread = 0;
    $read = 0;
    foreach ($content as $mention)
    {
        $id_str = $mention->id_str;

        $query = "SELECT * FROM mentions WHERE id_str='" . $id_str . "'";
        $result = mysqli_query($connect, $query) or die(mysqli_error($connect));
        if (mysqli_num_rows($result) == 1)
            $read++;
        elseif (mysqli_num_rows($result) == 0)
        {
            $unread++;
            $query = "INSERT INTO mentions (`id_str`) VALUES ('" . strip_tags(mysqli_real_escape_string($connect, $id_str)) . "');";
            $result = mysqli_query($connect, $query) or die(mysqli_error($connect));
        }
    }
    echo "#" . $unread . "\n";
?>
And that’s it, you’re done 😀
I know I haven’t explained codes line by line. But really, I don’t have to… Things are easily understandable and I’ll be more than happy to get in details if you ask 😀